19 Stars: Quilts of Indiana’s Past and Present

One of the first quilts I ever made was a king size lone star quilt.  In hindsight, starting my quilting journey with a king size was probably not the best idea, and my quilting aesthetic has changed significantly since the.  However; this is still one of my favorite quilts.  So when I was asked to visit the Indiana State Museum’s exhibit “19 Stars: Quilts of Indiana’s Past and Present” I was very excited.

Star combo only

19 Stars logo

The exhibit is in celebration of Indiana’s bicentenial and features a mixed collection of 38 historic and contemporary examples of star-themed quilts.  Indiana was the 19th state to join the Union and there are 19 stars on the Indiana State flag.  The quilts are from the museum’s collection as well as loans from some of Indiana’s best quilt artists. The majority of contemporary quilts were created specifically for the exhibit, which fills two galleries on Level 3 of the museum.

71.968.063.0520(front)

After walking through both galleries, I was surprised to find I was more drawn to the “traditional” quilts.  Overall they seemed more “modern” to me.  I especially loved this tied quilt, and the way a couple of the quilts had embroidered labels on the fronts, as opposed to the backs.  I will be sure to try and add these touches to a few of my quilts in the future.  All of the quilts were beautiful, and I would highly recommend that everyone check it out.

Bohemian Fireworks copy

The Indiana State Museum is located at 650 W. Washington Street in Indianapolis. Exhibition gallery hours are 10 a.m. to 5 p.m. Monday through Saturday and 11 a.m. to 5 p.m. on Sunday. The first Tuesday of each month (Community Tuesdays) admission is half price. Auxiliary aids and services are available with advance notice. For more information, call the museum at 317.232.1637.  For ticket information, please visit indianamuseum.org.

Succulents Fabric from Crimson Tate

It’s been awhile since I last posted, but I think I was just waiting for the perfect inspiration.  I am so excited to share with everyone a couple of projects I made for Heather Givans of Crimson Tate for her new fabric collection Succulents for Windham Fabrics.

Last year Heather told us she would be showing her very first fabric collection at the October 2014 Quilt Market, and she asked if anyone would help make projects for her to display in her booth.  Of course I jumped at the opportunity to sew with her beautiful fabrics, and help out a very sweet friend.

Heather4278

For my project I offered to sew up a pretty dress.  Heather picked out this beautiful gray and green print.  I think her Succulents fabrics lend themselves very well to garment sewing, especially this tiny plant print that has an almost vintage feel when sewn up as a dress or skirt. 9R1A0692

The pattern I chose was the Myrtle Dress from Colette Patterns.  The pattern is written for knits, but Sarai has a great tutorial on sewing it up with wovens.  The simple pattern is perfect for people new to garment sewing.  It has a relaxed draped neckline, elastic waist, and (my personal favorite) pockets!  This great dress works in the cool spring weather with a pair of tights and boots, and can take you into hot summer days with its sleeveless style. Our lucky friend Brook was selected as a model for Heathers look book, and her friend Eric did an amazing job taking these great photos!

9R1A0514

Now that Quilt Market has come and gone, I picked up some of this beautiful border print from her collection.  It is also a perfect print for garment sewing, so I decided to make a quick wrap skirt using another Colette Pattern, the Osaka Skirt, from her online publication Seamwork.

DSCF1322

If you can’t wait to get your hands on some Succulents comment below for a chance to win a bundle from Windham Fabrics.  Giveaway Closed. One comment will be chosen at random.  And be sure to check out all the other great stops along the blog hop for even more chances to win.  Here is the line up…

March 15: Heather Givans of Crimson Tate
March 16: Eric Lubrick of Eric Lubrick Photography
March 17: Sarah Sharp of {no} hats quilts }
March 18: Lindsay Lefevere of ellesquare
March 19: Karen McTavish of McTavish Quilting Studio
March 20: David Barnhouse of Crimson Tate
March 21: Meghan Eschbaugh of Calvin and Carolyn You are Here!
March 22: Brooke Starnes
March 23: Matthew Wheeler of Kapa Quilts
March 24: Samantha Howard of Bobaloo Kids
March 25: Amy Garro of 13 spools
March 26: Amanda Castor of Material Girl Quilts
March 27: Heather Jones of Heather Jones Studio
March 28: Heather Givans of Crimson Tate
Be sure to keep an eye on that Heather Givans, I anticipate many more amazing fabrics to come!  And one more photo of the Succulent Path quilt by Sarah, because I absolutely love it (and I had a blast helping her make these blocks).
Heather4304

Bloggers Quilt Festival

I have one more entry for this years Bloggers Quilt Festival.  This quilt I am entering into the large quilts category.  I posted about this quilt a couple of times last year (here, and here) if you are interested in the process of how this quilt was made.  It was quite a labor of love.  It is finally done, and I have to say I am so Happy with the result.  I finished it by quilting a heart in the area of our home town, Muskegon, MI, (by hand) then echoed the heart out across the state.  The quilting in the areas of the lakes is simple wavey horizontal lines.  I suppose now I need to make a map quilt of the Upper Peninsula of Michigan as an homage to my alma mater Michigan Technological University (Go Huskies!).  Now, no matter where we roam, we will have a little piece of home to take with us and keep us warm.

Home_is_f

Home_is_s

quilting photo

Quilt Stats

Title: Home is…

Size: approximately 76″ X 80″

Fabric: Seven Wonders by Parson Gray (David Butler) for Westminster

Machine Pieced and Quilted


Umbrella Prints Trimmings Competition and Bloggers Quilt Festival

While everyone is busy with Quilt Market, this spring has turned into the spring of challenge quilts. First up for consideration is my quilt for this year’s Umbrella Prints Trimmings Competition, as well as my entry for this year’s Bloggers Quilt Festival in the small quilt category.  Please be sure to visit the Umbrella Prints Pinterest board starting June 1st to pin my quilt, and visit the Bloggers Quilt Festival page to vote for me!

DSCF1133

Umbrella Prints is an Australian textile company, started in 2006, specializing in organic printed fabrics. I really love their fabrics, but I also love their environmentally friendly practices. Their annual trimmings competition, now in its 5th year, is a design challenge that forces you to look at a “waste” product (fabric scraps) with new eyes. Here is how it works, you buy a small packet of “trimmings” and make anything you want.

photo 2

It can be mixed media, apparel, home décor…anything. You post a picture of it on-line and send a link to your photo to Umbrella Prints. They pin your photo to their Pinterest board for this year and the voting begins (June 1st). There are prizes for a Judges award as well as a Pinners Choice award. This year they have also added a special Quilters category. How could I not throw my hat in the ring?  I bought a pack of their blue trimmings. To finish out my quilt I paired them with some hand screen printed trimmings from my friend Stefanie at 1606 and some solids in neutral tones with a pop of bright coral. The design was inspired by all the lovely southwest prints that I have seen around this season.  And the triangles were improvisationally pieced.

DSCF1134

DSCF1136

For the back I chose a light turquoise blue, and the quilting thread is a pale coral.  The quilting is predominantly stitch in the ditch, but I also added some triangle quilting to make the small triangle trimmings pop a little. And to finish it all out it is bound in the same coral fabric from the front.  After a trip through the wash it crinkled up so nicely. I really love how this quilt turned out. It feels more like art to me than just a baby quilt. Although I’m sure it will be great for snuggling too.

DSCF1141

DSCF1142

spring-2014-BQF-Button-300x290

Me Made May

Along with Selfish Sewing Week and the Spring Top Sew Along I wrote about last week comes Me Made May from Zoe at So Zo What do ya know?  I think it is an excellent way to showcase handmade items more frequently.  My most recent finish is my first self drafted pattern.  I modeled it after an old store-bought tank top that I love to wear all summer long.  It is slowly becoming too worn, so I decided to try my hand at replicating it.

DSCF1151

This top turned out a lot like my last Bess Top.   It is made from a light weight knit fabric on the front with a draped collar, and a really soft lightweight rayon challis by Amy Butler on the back.  The side seams are on an angle and I added a small box pleat to the back neck, which I think adds a nice architectural touch.

DSCF1170

I finished the neck and arm holes with knit binding just like the Bess Top.  I am really starting to like that type of finish.

DSCF1162


Calvin and I had a fun hike in a local nature park to snap this round of photos.  And we found these super fun swings along the creek running through the park.  How fun?

DSCF1175


Where would I be without my Man Friday?

DSCF1164

Selfish Sewing Spring Tops

It was a long winter here in the Midwest, but spring is finally here!

DSCF1097

And with spring comes Selfish Sewing Week from Rachel at Imagine Gnats and the Spring Top Sew Along from Rae at Made By Rae.  I decided this year I would make a Bess Top from Imagine Gnats.  I have made one of these tops previously and I love it.  As soon as it was finished I was planning to make more.  The top is designed to be made from woven cotton fabric, similar to quilting cotton.  Making it super simple for a novice garment sewer.  Although I will admit the wrap around sleeve it a little challenging.  But the pattern includes lots of great pictures which help a ton.  The pattern comes with three versions a shirt length, tunic length, and dress.  For both tops I decided to make the shirt length, but then decided to lengthen the pattern a bit, so it is probably more like the tunic version.

DSCF1111

For my current version I decided I wanted to try to use knit fabric for the front of the shirt to make it a little lighter for the hot summer months.  I Also decided to square off the neckline a tad.  I could not be happier.

DSCF1099

Calvin and I had a fun late breakfast (*bribe*) and went to a local park to snap some pictures.

DSCF1077

DSCF1085

Birds are chirping, flowers are blooming.  It’s gonna be a good year!

Quilts from the past

It appears I haven’t been doing a very good job of keeping up at my blogging; although I have a reasonable excuse. Last week I took the professional engineering exam for the old day job. It will be a while before I find out if I passed, so back to quilty things. On a somewhat day job related note…

A coworker of mine brought this lovely quilt top into the office a while back and asked if I would be able/willing to finish it for her. She had recently found it in a family hope chest, and didn’t know anything about it. She assumed it was made by a grandmother or great-grandmother. I told her from the looks of the hand stitching and types/prints of fabrics used it was likely from the 1930’s or 1940’s, and the pattern is traditionally called a trip around the world.

photo 3

I, of course, was more than happy to finish up this beauty for her. I have to admit that although I shy away from this scrappy trip type quilt, I really loved working on this project. There is just something about the smell and feel of an antique quilt.

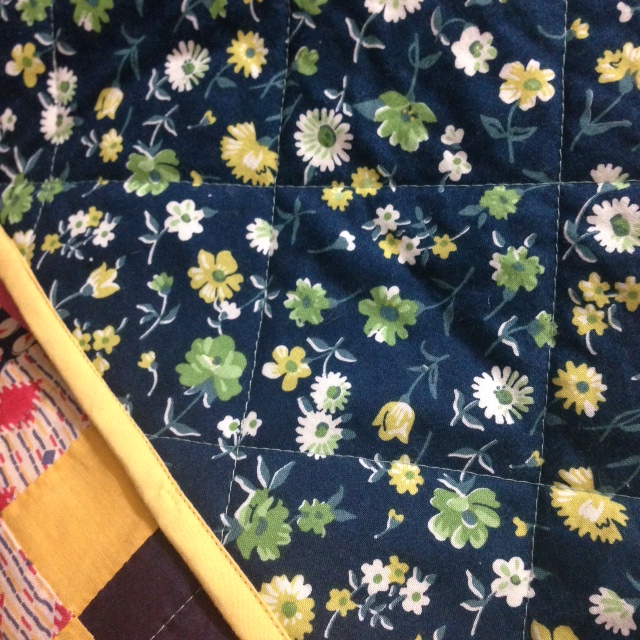
There was no major damage that needed repair and those hand stitches have held up pretty well over the years. So it was straight to basting. I decided on a navy, green, and yellow dainty floral by Denise Schmidt from Joann’s for the backing and a simple warm and natural batting. Where I normally would spray baste a quilt (especially one this size) to get a nice smooth finish, I decided to pin baste this quilt (with what seemed like hundreds of pins – my fingers are still recovering). I was sure it would not hold up well to a machine washing (which I always do to remove any residual spray baste funk).

photo 1

When I started basting I envisioned a traditional Baptist fan quilting design, but as I worked my way out the edges seemed fairly wavy, not to mention the fact that I didn’t think the delicate hand stitching would hold up to all the push and pull of free motion quilting. So, I settled on simple diagonal lines in a dusty green thread. I didn’t use any markings or guides I just eyeballed the center of every other square and went for it. (The squares were fairly small, at around 2”, so it wasn’t too difficult to stay centered).

photo 5

I could not find just the right dusty green to match the outside border of squares, so I settled on a light yellow, which I think turned out really nice. It was even a little hard to give back to Deb once it was done.

photo 4

Easy Hexagon Star Quilt

I recently posted some snapshots of this quilt in various places… 9

…and I have gotten some great feedback and requests for a pattern.  So I thought I would put together a little tutorial.  This quilt is very simple to construct with no Y-seams despite being constructed from hexagons.

One comment I got a lot was that the photos make the quilt look big, but it’s not.  This pattern is for a baby quilt, but is easily adaptable to a larger size.  My quilt finished at approximately 40-inches square.

Materials:

2 Moda Honeycomb Solids packs (or 72 6-inch hexagons)

Cut 5 of your hexagons in half.  These will be used to finish of the edges of the quilt.

6

Various prints cut into 3.5-inch equilateral triangles (23 groups of 6, or 138 total)

You can make all of the triangles different for a scrappy look or make groups of 6 matching triangles to get the star look that I used.

If you would like the star look I HIGHLY recommend laying out the entire quilt before sewing anything together.  You could also work from a sketch, but I think it is just easier to lay it out.

4

7Now comes the fun part, construction.  This quilt is worked in columns (or rows depending on how you look at it), and can easily be chain pieced.  I place the top left triangle on the first hexagon (or half hexagon), and the top right triangle on the next hexagon down the column.  Then repeat this all the way down the column.


8


Then stitch the triangles to the hexagons to form diamonds.  When you are stitching the triangles to the Hexagons make sure the corners of the triangle extend a ¼ inch past the edges of the hexagon.  Press the seams towards the triangles to aid in alignment in the next step.

Next stitch the diamonds together.  The seams where the triangles are stitched to the hexagons should just overlap; this will result in perfect points that meet in the middle.

photo 5

photo 1Press this seam open, to reduce bulk, and repeat for each column.

photo 2

Finally, stitch your columns together.

photo 3

See, wasn’t that easy?  Once you have your rows together you can baste and quilt.  I left my edges angled, but you can trim them straight or add extra triangles to make your quilt a little larger.  Once my quilt was quilted I trimmed the extra half hexagons to make my quilt square.

To finish this quilt I backed it with this cute Heather Ross frog print, and “straight line ” quilted wavy vertical lines.  If you make a star quilt of your own, please share it on Instagram or flicker and tag me.  I would love to see your creations!

back

top

Sewing Circle Tote

As some of you may not realize sewing is a very social activity.  Quilters and Seamstresses alike love getting together on a regular basis to eat, drink, and most importantly to sew.  So it should come as no surprise that we love to make tote bags to carry around all of our sewing supplies to various retreats, classes and meetings.  Lately, I have noticed a ton of great bags popping up on blogs and Instagram, and even in my own sewing circle, so I just had to jump on the bandwagon.

I wanted something big enough to carry a cutting mat, rulers, and an iron but with pocket for my smaller items like scissors and pin cushions.  Being a quilter I decided on Elizabeth Hartman’s Sewing Circle Tote.  She is in the process of redesigning her patterns but they will be available as a pdf download soon.  Her pattern is great for quilters because she gives a straight forward list of block sizes that can all be cut with a rotary cutter (i.e. no pattern pieces).  It’s also nice and big with LOTS of pockets.  Three interior zipper pockets (with great instructions for installing them), and five interior pouch pockets.   She also includes instructions for these great quilt as you go pocket panels for the exterior.  I decided to use some of my favorite Heather Ross and Echino scraps for these.

pocket 5 pocket 4 pocket 2 pocket 1

The construction is a bit difficult, with several layers of interfacing and its bulky three-dimensional structure (quilters are used to working on flat surfaces).  But with a little time and patience, it is easy to see it through.  I did make a couple of minor modifications, because that’s what I do.  I found this great cotton webbing at my local quilt shop, Crimson Tate, and paired it with brown peppered cotton for the exterior and and orange Sun Print by Alison Glass for the interior.  And FYI, if you haven’t seen the peppered cottons, they are AMAZING.  Super soft and lovely shot colors.  These are going to be my go to solids from now on I think.

photo 1

The webbing is a little wider than the 1” webbing that the pattern calls for, but it saved me having to make fabric covered straps, winning.  And I decided against the short set of straps.  I am tall enough that I can hold the long set of straps in one hand at my side and the bag is still off the floor, so I didn’t feel that the second set of straps was necessary.  I also think they would just get in my way when putting things in and out of the bag, which would basically just make me bonkers.  (And we all know I am bonkers enough on my own).

Once I got my bag all put together and was ready to finish the top edge I felt like it was a little too floppy.  All the pictures I saw online looked so structured and crisp, so I cut two pieces of peltex interfacing and slid them into the sides of my bag to add a little more structure before I finished the top edge.

photo 5

photo 4

All in all I am super happy with my new Sewing Circle Tote, and I can’t wait untill my next sewing get-together to show it off.  Who am I kidding, this will probably be my new all-purpose travel bag as well.  (Dreaming of QuiltCon 2015).

Long Distance Hugs

The hardest part of moving away from home is leaving behind friends and family. You miss the little things; afternoon coffee dates, girls night sappy movies, spa days for new haircuts after a crappy breakup. But you miss the big things too; 30th birthday parties, bachelorette parties, and baby showers. Well for me it seems like the last few years it has been a lot of the latter. I suppose I am just at that age where everyone I know is having kids. I would love more than anything to be at every single baby shower and to visit each and every friend in the hospital to see their new bundles of joy. (Although, as most of my friends know I DO NOT WANT TO KNOW ANY DETAILS. I think being pregnant is terrifying and gross).

Unfortunately, I have a demanding day job (and I don’t make millions, so I can’t hop on a jet for a day trip out-of-state). So into boxes I squish the best long distance hug I know how to give, a baby quilt. I spend hours picking just the right fabrics for the mom to be. I want to match her nursery, fit her style, and be cute for baby, but not too cute. I choose a pattern that I think will fit my fabric choices, but will still interesting for me to make (I do have to spend hours working on it after all; it may as well be entertaining for me). I spend even more time choosing a quilting design, and I will admit that I have used baby quilts to practice and expand my free motion quilting skills. I machine wash and dry each quilt once it’s done to make sure it will stand up to daily use. Then I carefully fold each quilt, pretty side out, place it in a box with tissue paper just like a real shower gift, and cringe as I drop it off at the post office (I worry it will get lost in the mail every single time). It may not seem like much, but each hour I pour into making each quilt, is my way of cuddling up with those cute babies.

Here is the newest addition to the baby quilt line-up.  This one is for a dear friend that I even tried to con into moving closer to me.  She did, eventually, in a round-about way, but she’s still too far to make girls night practical.  Personally, I really love this quilt.  It has a great sophisticated feel and I LOVE the three blind mice on the back.

photo 1

photo 2

photo 3 photo 4

But this is all I have, a pretty picture of a quilt hanging on my wall. So wrap those babies up tight ladies and send me a picture, that’s my favorite part.